

Introduction
Playing with PnP Provisioning is funny as you have different set of features and requirements you can achieve when provisioning sites.
Last month I found sort of bug at version v2.4.1605 of PnP Core: Can not Convert Object when provisioning pnp:file Display Template.
Working with the same version I had a requirement to provision a Content Type that inherits of Item but we MUST hide OOTB Title column and provision List Instance, bind the Content Type to the new List and enable contextual menu on the Custom_Title field.
If it is the first time you use the PnP Provisioning, please highly recommends you look into this GitHub page (where MS publish the PnP Core solution).
Using PnP Provisioning:
I will quick remind a step by step to start using PnP Provisioning:
- Create Console Application to invoke PnP Core classes.
Add Packages needed using Package Manager Console. Here is how my packages.config looks like:
This file contains hidden or bidirectional Unicode text that may be interpreted or compiled differently than what appears below. To review, open the file in an editor that reveals hidden Unicode characters. Learn more about bidirectional Unicode characters<?xml version="1.0" encoding="utf-8"?> <packages> <package id="AppForSharePointOnlineWebToolkit" version="3.1.2" targetFramework="net45" /> <package id="Microsoft.AspNet.WebApi.Client" version="5.2.3" targetFramework="net45" /> <package id="Microsoft.AspNet.WebApi.Core" version="5.2.3" targetFramework="net45" /> <package id="Microsoft.Azure.ActiveDirectory.GraphClient" version="2.1.0" targetFramework="net45" /> <package id="Microsoft.Azure.KeyVault.Core" version="1.0.0" targetFramework="net45" /> <package id="Microsoft.Data.Edm" version="5.6.4" targetFramework="net45" /> <package id="Microsoft.Data.OData" version="5.6.4" targetFramework="net45" /> <package id="Microsoft.Data.Services.Client" version="5.6.4" targetFramework="net45" /> <package id="Microsoft.SharePointOnline.CSOM" version="16.1.5026.1200" targetFramework="net45" /> <package id="Newtonsoft.Json" version="6.0.8" targetFramework="net45" /> <package id="SharePointPnPCoreOnline" version="2.4.1605.0" targetFramework="net45" /> <package id="System.Spatial" version="5.6.4" targetFramework="net45" /> <package id="WindowsAzure.Storage" version="7.0.0" targetFramework="net45" /> </packages> Now, we can see OfficeDevPnP.Core in our Project References:
Create a function to read the XML file (Provisioning Template) and Apply it to Web object on SharePoint or Office 365.
Call this function from Main method but before configure your environment settings.
This file contains hidden or bidirectional Unicode text that may be interpreted or compiled differently than what appears below. To review, open the file in an editor that reveals hidden Unicode characters. Learn more about bidirectional Unicode charactersusing Microsoft.SharePoint.Client; using Microsoft.SharePoint.Client.WebParts; using OfficeDevPnP.Core.Framework.Provisioning.Connectors; using OfficeDevPnP.Core.Framework.Provisioning.Model; using OfficeDevPnP.Core.Framework.Provisioning.ObjectHandlers; using OfficeDevPnP.Core.Framework.Provisioning.Providers.Xml; using System; using System.IO; using System.Security; using System.Threading; namespace JQ.Pnp.Updates { class Program { static void Main(string[] args) { string sitecollectionUrl = "https://tenant.sharepoint.com"; string targetWebUrl = sitecollectionUrl + "/sites/test"; string userName = "user@tenant.onmicrosoft.com"; string password = "pass"; string templatePath = @".\Config\dist\JQ.SiteCollection.Template.xml"; // Provision Site Columns, Content Types, Display Templates, ApplyProvisioningTemplate(targetWebUrl, userName, password, templatePath); string targetWebUrlRes = targetWebUrl + "/resources"; string templatePathRes = @".\Config\dist\JQ.Resources.Template.xml"; // Provision List Instance for Quick Links ApplyProvisioningTemplate(targetWebUrlRes, userName, password, templatePathRes); } public static void ApplyProvisioningTemplate(string webUrl, string userName, string password, string templatePath) { // Create secure string SecureString pwd = new SecureString(); foreach (char c in password.ToCharArray()) pwd.AppendChar(c); // Get current execution directory string path = System.Reflection.Assembly.GetExecutingAssembly().Location; var directory = System.IO.Path.GetDirectoryName(path); var assetsPath = Path.Combine(directory, "Assets"); Console.WriteLine("Apply Provisioning Template Started..."); Console.WriteLine("Current directory: " + directory); Console.WriteLine("Assets directory: " + assetsPath); Console.WriteLine(); // Create Provisioning Template object using current directory Path XMLTemplateProvider provider = new XMLFileSystemTemplateProvider(directory, ""); ProvisioningTemplate template = provider.GetTemplate(templatePath); // File System Connector is intended to add Assets path as default path when PnP Core read the XML Templates. // On this way, we can put relative references inside the XML Templates. FileSystemConnector connector = new FileSystemConnector(assetsPath, ""); template.Connector = connector; using (var ctx = new ClientContext(webUrl)) { ctx.Credentials = new SharePointOnlineCredentials(userName, pwd); ctx.RequestTimeout = Timeout.Infinite; Web web = ctx.Web; ctx.Load(web); ctx.ExecuteQueryRetry(); Console.WriteLine("Site URL where Apply Template: " + ctx.Web.Url); Console.WriteLine(); // Create this object to track the provisioning stages ProvisioningTemplateApplyingInformation ptai = new ProvisioningTemplateApplyingInformation { ProgressDelegate = (message, progress, total) => { Console.WriteLine("{0:00}/{1:00} - {2}", progress, total, message); }, MessagesDelegate = (message, messageType) => { Console.WriteLine("{0} - {1}", messageType, message); } }; // Apply Provisioning Template to Web Object (Not to Site object). web.ApplyProvisioningTemplate(template, ptai); } Console.WriteLine("Done! Template Applied."); Console.WriteLine(); } } } Create a two folders in your Project:
- Assets folder: where you can put all the files you need to provision (Display Templates, Master Pages, JS, CSS, Page Layouts, WebParts, etc.)
- Config folder: where you can put all your Provisioning Template xml files.
Create Site Collection level Provisioning Template (JQ.SiteCollection.Template.xml):
This file contains hidden or bidirectional Unicode text that may be interpreted or compiled differently than what appears below. To review, open the file in an editor that reveals hidden Unicode characters. Learn more about bidirectional Unicode characters<?xml version="1.0" encoding="utf-8" ?> <pnp:Provisioning xmlns:pnp="http://schemas.dev.office.com/PnP/2015/12/ProvisioningSchema"> <pnp:Preferences Generator="OfficeDevPnP.Core, Version=2.4.1605.0, Culture=neutral, PublicKeyToken=3751622786b357c2" /> <pnp:Templates> <pnp:ProvisioningTemplate ID="JQ.Template.SiteCollection" Version="1"> <pnp:SiteFields> <Field ID="{d2eea0c6-3456-45a5-5432-5aa0252b3fbb}" Name="Custom_QuickLinksLink" StaticName="Custom_QuickLinksLink" DisplayName="Custom Link" Type="URL" Format="Hyperlink" Required="FALSE" Group="JQ Site Columns"> </Field> <Field ID="{e0dc2729-2147-4478-9692-3f6d6b939381}" Name="Custom_QuickLinksTitle" StaticName="Custom_QuickLinksTitle" DisplayName="Custom Title" Type="Text" EnforceUniqueValues="FALSE" Indexed="FALSE" Required="TRUE" Group="JQ Site Columns" LinkToItemAllowed="Required" LinkToItem="True" ListItemMenuAllowed="Required" ListItemMenu="True"> </Field> </pnp:SiteFields> <pnp:ContentTypes> <!-- Parent ContentType: Item (0x01) --> <pnp:ContentType ID="0x0100588B4EA1685243B09EB31B3565C949A8" Name="Custom Quick Links" Group="JQ Content Types" Description="Quick Links Content Type" Inherits="TRUE"> <pnp:FieldRefs> <!-- OOTB Title GUID - It is not required, we will hide it. Doing this, Title column will not appear in New Form --> <pnp:FieldRef ID="{fa564e0f-0c70-4ab9-b863-0177e6ddd247}" Required="false" Hidden="true" Name="Title" /> <!-- Rest of fields previously created --> <pnp:FieldRef ID="e0dc2729-2147-4478-9692-3f6d6b939381" Required="true" Name="Custom_QuickLinksTitle" /> <pnp:FieldRef ID="d2eea0c6-3456-45a5-5432-5aa0252b3fbb" Required="false" Name="Custom_QuickLinksLink" /> </pnp:FieldRefs> </pnp:ContentType> </pnp:ContentTypes> <!-- Some files examples, not important for this scenario, but just to keep in mind what we can do with PnP Provisioning --> <pnp:Files> <!-- Master Pages --> <pnp:File Src=".\MasterPages\custom.master" Folder="_catalogs/masterpage" Overwrite="true" /> <!-- Content Editor --> <pnp:File Src=".\CEWP\CEWP_Home_Custom.html" Folder="Style Library/ContentEditor" Overwrite="true" /> <!--Scripts--> <pnp:File Src=".\Scripts\Custom.js" Folder="Style Library/Scripts" Overwrite="true" /> <!-- Styles --> <pnp:File Src=".\Styles\Custom.MasterPage.min.css" Folder="Style Library/Styles" Overwrite="true" /> <!-- Display Templates --> <!-- Web Parts in Gallery --> <pnp:File Src=".\WebParts\ExportedAndChangedWP.dwp" Folder="_catalogs/wp" Overwrite="true" /> </pnp:Files> </pnp:ProvisioningTemplate> </pnp:Templates> </pnp:Provisioning> In this case, we will Provision:
- A new Hyperlink field.
A new Text field used as a Custom Title. It is important to use these four attributes to enable the field as a Link and Menu in the SharePoint views:
1
2
3
4
LinkToItemAllowed="Required"
LinkToItem="True"
ListItemMenuAllowed="Required"
ListItemMenu="True"Thank you Dario for your post: Linking a custom column to the Item and the Item menu.
- A new Content Type that inherits of Item but with the two new fields previously created and OOTB Title column hidden.
Create Sub-site level Provisioning Template (JQ.Resources.Template.xml).
This file contains hidden or bidirectional Unicode text that may be interpreted or compiled differently than what appears below. To review, open the file in an editor that reveals hidden Unicode characters. Learn more about bidirectional Unicode characters<?xml version="1.0" encoding="utf-8" ?> <pnp:Provisioning xmlns:pnp="http://schemas.dev.office.com/PnP/2015/12/ProvisioningSchema"> <pnp:Preferences Generator="OfficeDevPnP.Core, Version=2.4.1605.0, Culture=neutral, PublicKeyToken=3751622786b357c2" /> <pnp:Templates> <pnp:ProvisioningTemplate ID="JQ.Template.Subsite" Version="1"> <pnp:Lists> <pnp:ListInstance Title="Quick Links" Description="" DocumentTemplate="" TemplateType="100" Url="Lists/QuickLinks" MinorVersionLimit="0" MaxVersionLimit="0" DraftVersionVisibility="0" TemplateFeatureID="00bfea71-de22-43b2-a848-c05709900100" EnableFolderCreation="false"> <pnp:ContentTypeBindings> <pnp:ContentTypeBinding ContentTypeID="0x0100588B4EA1685243B09EB31B3565C949A8" Default="true" /> </pnp:ContentTypeBindings> <pnp:Views> <View Name="{f7e8e1e1-6459-4b83-b7db-ecff208bf28a}" DefaultView="TRUE" MobileView="TRUE" MobileDefaultView="TRUE" Type="HTML" DisplayName="All Items" Url="/Lists/QuickLinks/AllItems.aspx" Level="1" BaseViewID="1" ContentTypeID="0x" ImageUrl="/_layouts/15/images/generic.png?rev=42"> <Query> <OrderBy> <FieldRef Name="ID" /> </OrderBy> </Query> <ViewFields> <FieldRef Name="Custom_QuickLinksTitle" /> <FieldRef Name="Custom_QuickLinksLink" /> </ViewFields> <RowLimit Paged="TRUE">30</RowLimit> <JSLink>clienttemplates.js</JSLink> </View> </pnp:Views> <pnp:DataRows> <pnp:DataRow> <pnp:DataValue FieldName="Custom_QuickLinksTitle">Test Link</pnp:DataValue> <pnp:DataValue FieldName="Custom_QuickLinksLink">{sitecollection}</pnp:DataValue> </pnp:DataRow> </pnp:DataRows> </pnp:ListInstance> </pnp:Lists> </pnp:ProvisioningTemplate> </pnp:Templates> </pnp:Provisioning> A new list will be provisioned using and binding to the previously created Content Type.

Conclusion
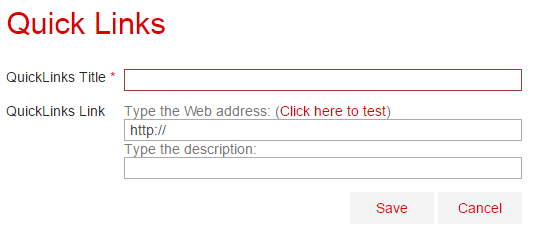
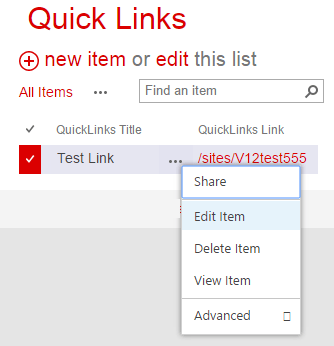
This is how the solution looks at the end, and we have meet two requirements:

